Mailchimp Pro (for WooCommerce)
Send customer details from the WooCommerce checkout to Mailchimp.
Mailchimp Pro (for WooCommerce)
Send customer details from the WooCommerce checkout to Mailchimp.
WooCommerce Add-ons
What does Mailchimp Pro do?
Mailchimp Pro (for WooCommerce) adds a ‘Subscribe’ checkbox to your checkout, making it easy to capture customer email addresses – and optionally their names, phone numbers, addresses, company and birthday – into your Mailchimp audience.
This requires:
- A WooCommerce store
- A Mailchimp account (free or paid) with at least one audience already created
The plugin can be configured with several options, including:
- Customise the checkbox label
- Select the checkbox placement in the checkout form
- Optionally also include the customer name, phone number, address, company or birthday when pushing to Mailchimp
- Enable the checkbox by default
- Send a confirmation email to the customer once their order is complete (if they have subscribed)
- Confirmation email designer with convenient short tags
- Send test email confirmations

Where are the settings?
Go to WooCommerce → Settings → Mailchimp to configure the plugin.
How to configure Mailchimp Pro
Setting up only takes a minute or two.
- Go to WooCommerce → Settings → Mailchimp.
- Enter your API key into the API key field.
- Click the Save Changes button (this is initially required) and wait for the page to reload.
- Click the Fetch Audiences button.
- Select the audience you want to push customer details to.
- Click the Fetch Tags button and choose the tags – or enter new ones – that you want included with the customer details.
- Configure any of the remaining optional settings.
- Hit the Save Changes button.
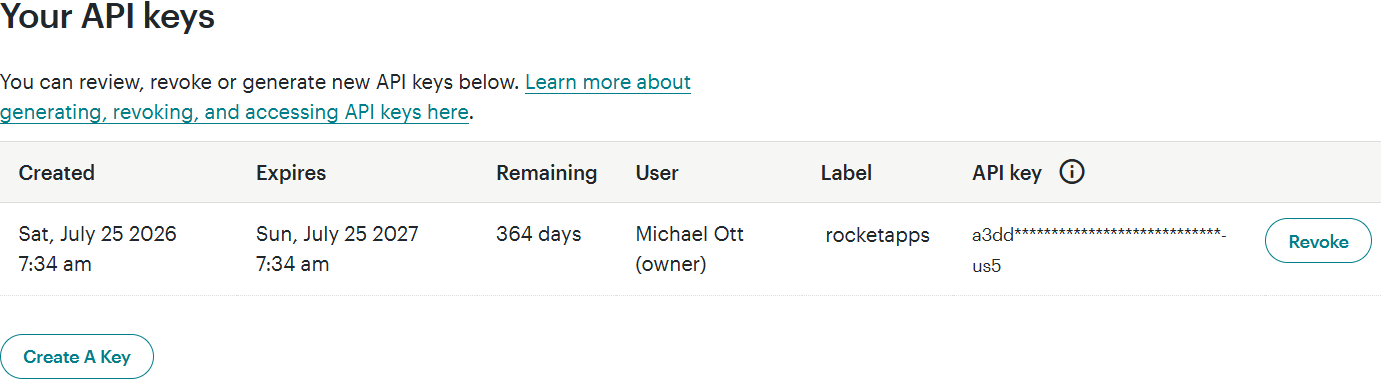
Where can I find my Mailchimp API key?
This plugin requires an API key provided by Mailchimp.
- Log in to your Mailchimp account.
- Click your profile icon and choose Profile.
- Click the Extras drop-down then choose API keys.
- In the Your API Keys section, click Create A Key.
- Give your key a name (your website name is ideal).
- Click Generate Key.
What does the Resubscribe setting do?
Every checkout that pushes customer details to Mailchimp behaves differently depending on whether the customer is already in your audience.
- New email address
Always added with status subscribed. The Resubscribe setting has no effect here, since there’s nothing to resubscribe. - Existing subscribed contact
Unaffected either way. They just get their details refreshed. - Existing unsubscribed contact
This is the only case Resubscribe changes anything.
Off (default): Their status is left alone. They stay unsubscribed, even though they opted in again at checkout. This is the safer default, because someone who unsubscribed from your list once generally shouldn’t be silently re-added just because they bought something.
On: The plugin explicitly tells Mailchimp to set their status back to subscribed, overriding their previous unsubscribe.
Why it’s off by default
Re-subscribing someone without fresh, unambiguous consent can run into trouble with privacy laws like GDPR or Australia’s Spam Act, since “they checked a box at checkout” may not count as valid re-consent if they’d previously opted out. Store owners should only turn this on if they’re confident that ticking the checkout checkbox again constitutes valid consent in their region.
It’s recommend leaving this off unless you have a specific reason to turn it on, and checking with your own legal/compliance advice if you’re unsure.
Limitation
Mailchimp itself can restrict resubscribing certain contacts via the API. For example, addresses that were previously marked as a spam complaint or cleaned from the list for compliance reasons may reject the resubscribe attempt entirely, regardless of this setting.
What does the Pre-Checked Checkbox setting do?
Enabling this option will pre-select the checkbox, making it likely that customers will overlook it and unintentionally opt in to receive your marketing communications.
Pre-selecting an opt-in checkbox is widely regarded as a deceptive user interface pattern (often referred to as a “dark pattern“). In many jurisdictions, including parts of the EU and the US, this practice may be restricted or prohibited under consumer protection and privacy laws.
Use this setting responsibly and ensure your implementation complies with all applicable laws and regulations.
Error code
Invalid API credentials will return an error code when fetching an audience from Mailchimp.
Error: Your API key may be invalid, or you've attempted to access the wrong datacenter
If this happens, double check the API credentials provided by Mailchimp and try again.
Confirmation Email Designer
The Confirmation Email Designer provides an easy way to create and customise the email your customers receive when their order is completed. This is helpful if you operate in a jurisdiction where it’s a legal requirement to advise your customers when they opt-in to a service or have been added to a mailing list.
To get started, simply enable the Send a confirmation email option and the Confirmation Email Designer will appear below.
Need help with the design? Click the Insert Starter Template button to load a basic starter template into the editor.
At the bottom of the editor, you’ll find a list of handy short tags. Clicking any of them will insert the tag at your cursor’s current position.

Short tags provided include:
- Customer name
- Customer email
- Site title
- Site tagline
- Site URL
- Admin email
- Date
- Order ID
- Privacy Policy URL
Prefer to edit the HTML directly? Just switch to the Code tab.
Send a Test Email
To preview how your email will appear in your customers’ inboxes, use the Test Email feature.
Simply enter an email address and click Send Test Email.
For convenience, you don’t need to save your changes each time before sending a test email. You can continue making edits and sending test emails as needed, then save your changes once you’re happy with the final result.

Enable logging
Used mainly by developers, enabling this option will assist with troubleshooting by logging API responses from Mailchimp.
The log can be found among the other WooCommerce logs located in: WooCommerce → Status → Logs.
Note: There is no good reason to keep this option enabled all the time, so be sure to disable the setting when you have finished debugging.
Where do I enter my license key?
Go to WooCommerce → Settings → Mailchimp and enter your license key.
Once entered and activated, the settings interface will automatically load.
Is the plugin price a one-time payment or an annual subscription?
The choice is yours.
Your purchase includes 12 months of updates and support, giving you ongoing access to the latest features, improvements, and assistance whenever you need it.
After this period, you can optionally renew your license to continue receiving updates and support. Even if your license expires, the plugin will keep working without interruption. However, an active license helps ensure your site remains secure, compatible, and performing at its best.
Without renewal, you won’t receive future updates or have access to support until your license is reactivated.
For the best experience and peace of mind, we recommend renewing your license. Renewal extends your updates and support for a further 12 months from the date of renewal.
Changelog
1.0.0 (26th July 2026)
- Initial release.
 new
new
- Version: 1.0.0
- Updated: July 26, 2026
- Required: WordPress 6.0+
New! Pay in 4 with PayPal
Split 4 payments over 6 weeks

Shop With Confidence Get a refund within 30 days, no questions asked.
Help Topics
- What does Mailchimp Pro do?
- Where are the settings?
- How to configure Mailchimp Pro
- Where can I find my Mailchimp API key?
- What does the Resubscribe setting do?
- What does the Pre-Checked Checkbox setting do?
- Error code
- Confirmation Email Designer
- Send a Test Email
- Enable logging
- Where do I enter my license key?
- Is the plugin price a one-time payment or an annual subscription?
- Changelog