Woo to Zoho Books
Automatically push WooCommerce orders to Zoho Books.
What does this plugin do?
WooCommerce to Zoho Books automatically pushes your WooCommerce orders to Zoho Books as invoices, keeping your bookkeeping up to date without any manual data entry.
When an order is triggered, an invoice is created in Zoho Books with all the relevant order details, including customer information, billing and shipping addresses, line items, discounts, taxes, and shipping costs and more.
Payments are recorded against the invoice automatically (if you enable the setting), reflecting what was already collected through WooCommerce. If an order is cancelled in WooCommerce, the corresponding invoice in Zoho Books is voided and deleted (also an option you can enable).
The plugin is strictly one-way, as it exists purely for bookkeeping purposes and does not interfere with your WooCommerce store or trigger any emails from Zoho.
Features
- Automatically creates a Zoho Books invoice when a WooCommerce order reaches a configurable status trigger (Completed, Processing, On Hold, or Pending).
- Automatically records payment against the invoice, so there’s no manual action required in Zoho Books (if you enable the setting).
- Cancelling an order in WooCommerce voids and deletes the matching Zoho Books invoice (if you enable the setting).
- Customer records are created in Zoho Books automatically, with billing and shipping addresses, and matched by email on subsequent orders to prevent duplicates.
- Choose between using the WooCommerce order number or Zoho Books’ own auto-generated invoice numbering.
- Map any WooCommerce order field or custom order meta to Zoho Books invoice custom fields.
- Zoho Books metabox on every order edit screen showing push status, invoice number, and a direct link to the invoice in Zoho Books.
- Manual push button on each order for on-demand invoice creation.
- Bulk push tool to push all existing orders to Zoho Books in one operation, complete with a progress bar, live counter, elapsed timer, and time estimate.
- Simulation mode for the bulk push tool, so you can preview the process without committing any data.
- Optional WooCommerce orders list column showing at a glance which orders have been pushed.
- Supports WooCommerce High Performance Order Storage (HPOS).
- No emails sent from Zoho Books (the plugin is silent by default).
- Supports all Zoho Books data centre regions (Global, EU, India, Australia, Japan, UK).
How to get an API key and your Organisation ID
Getting a Zoho Books API key is easy.
Login into the Zoho API console and click on Add Client.
Select Server-Based Application and complete the required details. For the purposes of this tutorial, we will use a function company called ‘AMCE Incorporated’.
- Client Name: This can be anything you choose (many users simply use their business name). For example: AMCE Incorporated.
- Homepage URL: Enter the full URL of the website where this plugin is installed. For example: https://acme.com
- Authorised Redirect URIs: https://acme.com/wp-admin/admin.php?page=woo-to-zoho-books-settings&wzb_oauth=1

Once everything is filled in, click Create. You will now see your Client ID and Client Secret.
How to find your Organisation ID
- Login to Zoho.
- Click on the settings (cog) icon in the upper right.
Below the Organisation heading click on Profile and you will see your organisation ID next to Organization Profile.

How to automatically push new orders to Zoho Books
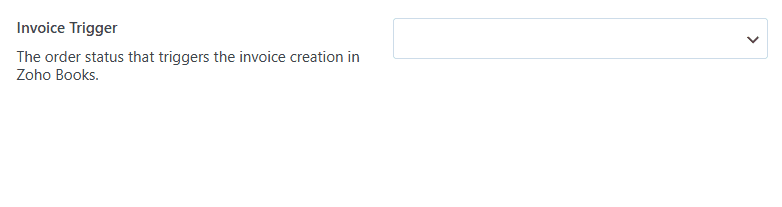
Go to Settings → Woo to Zoho Books → Invoice Settings, then select the invoice status you want to push from the Invoice Trigger option.
For most workflows, you’ll typically want orders to be pushed to Zoho Books once they are Completed.
Available options:
Completed
The order has been fully paid, shipped (if applicable) and no further action is required.
On Hold
The order status has been manually set to On Hold.
Pending Payment
The customer has not yet completed payment. Commonly used for bank transfers, in-person payments, or similar offline payment methods.
Processing
Payment has been received, but the order is still awaiting fulfilment (you still have to ship a physical product for example).
Additionally, updating an order’s status from the WooCommerce admin area will also trigger a push to Zoho Books when the new status matches the configured Invoice Trigger setting.
How to map custom fields
Custom fields are only available on paid Zoho Books plans. If you’re using a free account, custom field mapping is not supported.
For paid users, you can create custom invoice fields in Zoho Books and map them to your WooCommerce order fields. These mapped values will then be automatically included whenever an invoice is created. Zoho Book will also let you optionally include the custom fields on invoices that get sent to customers.
Why Map Custom Fields?
Mapping custom fields from WooCommerce orders to Zoho Books invoices lets you carry across extra information that isn’t included in the standard order/invoice data.
For example, WooCommerce might store things like delivery instructions, internal reference numbers, marketing source, salesperson, department or special customer notes. By mapping these to Zoho Books custom fields, that information automatically appears with the invoice when it’s created.
In short, it ensures important context isn’t lost when orders are converted into invoices.
How to Create Custom Fields in Zoho Books Invoices
- Login to Zoho Books.
- Go to Settings.
- Select Invoices under Sales.
- Navigate to Field Customisation and click + New Custom Field.
- Enter the Label Name and select Data Type.
- You can optionally choose to make the custom field mandatory and display it on the PDF based on your preferences.
- Click Save.
How To Map Custom Fields
- In the plugin settings click Custom Fields.
- Click the Get Fields button to retrieve your custom fields from Zoho Books.
- After a few seconds, you’ll see a confirmation showing how many fields were found.
- Click + Add Field to start mapping your WooCommerce fields to the corresponding Zoho Books fields.
- You can repeat this step to add additional mappings as needed.
- Once you’ve finished setting up your mappings, click Save Settings.

Allow voiding and deleting invoices
When the Allow Voiding and Deleting Invoices options are enabled, cancelling, refunding, or deleting an order in WooCommerce can automatically void and delete the corresponding invoice in Zoho Books. This helps keep your records clean and up to date without manual effort.
You can choose when this applies:
- When an order is cancelled
- When an order is refunded
- When an order is deleted
If any of these options are left disabled, the invoice in Zoho Books will not be affected for those actions.
Note: The When an order is deleted option only applies to orders that are permanently deleted. Orders moved to the trash will not trigger this action, and you’ll need to permanently delete them from the trash for it to take effect.
Automatically record payments
By default, orders pushed to Zoho Books are created without any payment recorded. This may suit your workflow if you prefer to handle payments separately.
If you’d like invoices to be automatically marked as paid as soon as a WooCommerce order is completed, enable the Record Payment setting. This is especially useful if you sell virtual products (such as software), where payment is received immediately.
Important things to consider before doing a bulk push
Using the bulk push function will send all your orders to Zoho Books in one go. Before you proceed, please keep the following in mind.
Pushing Cannot be Undone
If you proceed with a bulk push and then decide you didn’t want all the invoices created in Zoho Books, it may become more complex than expected.
While Zoho Books allows bulk deletion of invoices, it does not support bulk deletion of invoices that have had payment entered (marked as paid). In those cases, you will need to manually remove payments from each invoice before they can be deleted, one by one.
However, this will not be an issue if you did not have the Record Payment setting enabled during the bulk push, as the invoices at Zoho Books won’t have payment entered yet, and therefore are able to be deleted in bulk.
Note 1: You can simulate a bulk push before committing to it.
Note 2: Deleting an invoice at Zoho Books does not delete the corresponding customer.
$0 Orders Will Be Skipped
Zoho Books does not accept invoices with a total of $0, so these orders will be skipped during a bulk push.
Orders that have already been pushed to Zoho Books will also be automatically skipped to avoid duplicates.
Interrupting a Bulk Push
If the settings page is reloaded while a bulk push is in progress (whether intentionally or not) the process will stop. However, since each order is marked once it’s been pushed, the operation can be safely resumed.
Simply start the bulk push again and it will continue from where it left off.
What data gets pushed to Zoho Books?
When an order is pushed to Zoho Books, data from the standard WooCommerce order fields is automatically transferred to the invoice, while the customer’s details are sent to the ‘Customers’ section. This includes:
Customer:
- Name
- Email address
- Company
- Phone
- Billing address
- Shipping address
Invoice:
- Date
- Invoice number
- Customer billing details
- Due date
- P.O. number
- Purchased items (one per line)
- Invoice total
- Payment status
Custom Fields
- Any Custom Fields you mapped
How to simulate a Push (Dry Run)
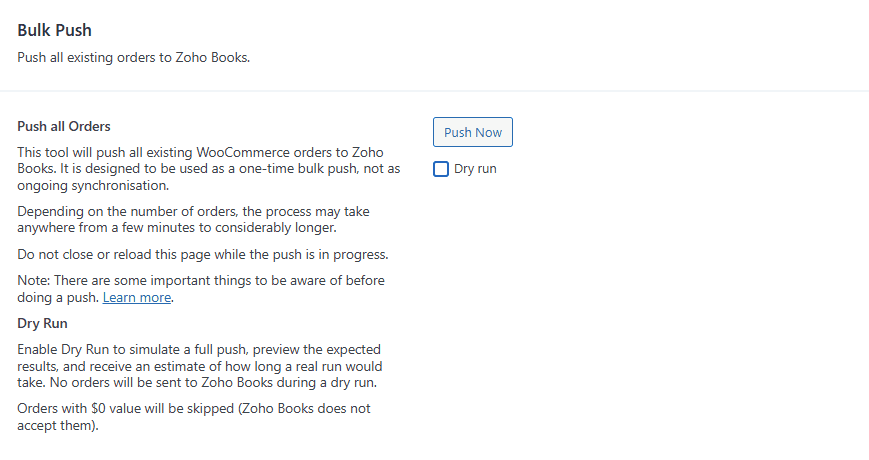
Selecting the Dry Run option will execute a simulated push without sending any data to Zoho Books. This allows you to see what a real run would produce, without making any permanent changes.
Simply tick Dry Run before clicking Push Now to start the simulation.
How to bulk push all current orders to Zoho Books
To push all orders to Zoho Books, go to Settings → Woo to Zoho Books → Invoice Settings, then select the invoice status you want to push from the Invoice Trigger option. For example, if you select Completed, only the completed orders will be pushed.
Next, click Bulk Push and hit Push Now to begin. You will be given two confirmation prompts to proceed. If you proceed and change your mind, you can stop the push by clicking the Stop button.
You can optionally save the push results to a log file. To enable this, go to Tools and turn on the Log to File option.
If you haven’t already, please review this important information about the Bulk Push feature.
Important Information
If you need to push a large number of orders – such as thousands at once – the initial push may take a considerable amount of time. In this situation, it may be more efficient to export your existing orders from WooCommerce and import them directly into Zoho Books, then use this plugin to automatically push all future orders going forward.
How to bulk push multiple specific orders to Zoho Books
If you don’t want to push all orders to Zoho Books, you can instead select specific orders to push.
A word of caution, pushing orders from this section bypasses the usual safeguards. There are no checks to prevent orders from being pushed that are already in Zoho Books, which may result in duplicate invoices being created. Exercise caution when using this feature.
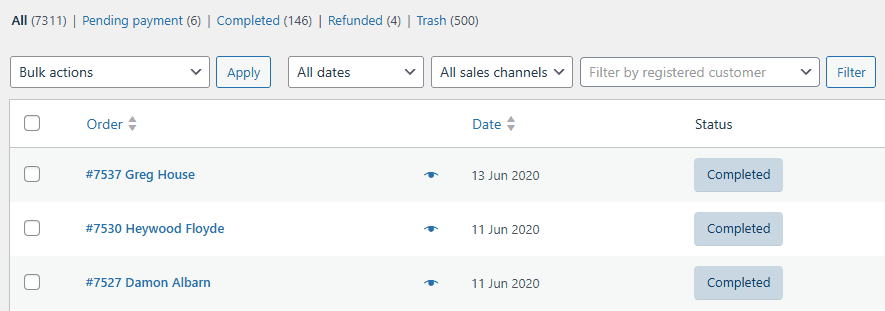
Go to the WooCommerce Orders page, select the orders you want to export, choose Push to Zoho Books from the bulk actions dropdown, and then click Apply.
About the admin column
When the Admin Column option is enabled, a new column is displayed on the WooCommerce Orders page showing which orders have been pushed to Zoho Books.
However, this only indicates that an order was previously pushed. It does not confirm that the corresponding invoice still exists in Zoho Books, as it may have been deleted or modified after the push.
You can quickly verify whether the invoice still exists by clicking the corresponding tick in the admin column.
Invoice numbers in Zoho Books
Zoho Books offers two options for managing invoice numbers. To ensure invoices are numbered correctly, the setting selected in the plugin must match the configuration in Zoho Books.
In your WordPress dashboard, navigate to Settings → Woo to Zoho Books → Main Settings. Scroll down to Invoice Number Preferences, then choose either of the following options:

Click Save Settings once you’ve made your selection.
Next, log in to Zoho Books and confirm that the invoice numbering setting matches the option you selected in the plugin.
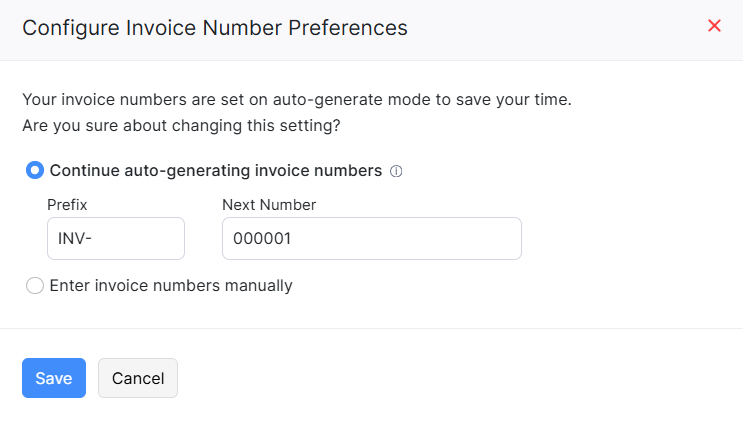
To learn how to change the invoice numbering in Zoho Books, refer to the official guide: How do I configure auto-generation of invoice numbers?
Not sure which option to choose? Learn the differences.
What is the difference between the invoice numbering options?
Continue Auto-Generating Invoice Numbers
With this option enabled, Zoho Books will automatically generate invoice numbers based on your chosen numbering scheme.
This is the recommended option if you already have an established invoice numbering sequence in Zoho Books that you need to continue with.

Notice the WooCommerce order number is still referenced in the Order Number column.
Enter Invoice Numbers Manually
Despite the name, no manual entry is required. When orders are pushed, the WooCommerce order number will automatically be used as the Zoho Books invoice number.
This can be useful if you want your WooCommerce order numbers and Zoho Books invoice numbers to match exactly.

Prevent resending customer emails
In older versions of WooCommerec there is a known issue where, if HPOS (High-Performance Order Storage) is enabled in your WooCommerce feature settings, restoring completed orders from the trash will resend the customer email notifications.
If you are running WooCommerce 10.8.1 or lower and have HPOS enabled, enable this setting to prevent customer emails notifications from being sent again when orders are restored from the trash.
To enable the setting, go to Settings → Woo to Zoho Books → Tools and enable the Prevent resending customer emails option.

Find Out Your Storage System
To find out which storage system you have enabled, go to WooCommerce → Settings → Advanced → Features and look next to Order data storage.
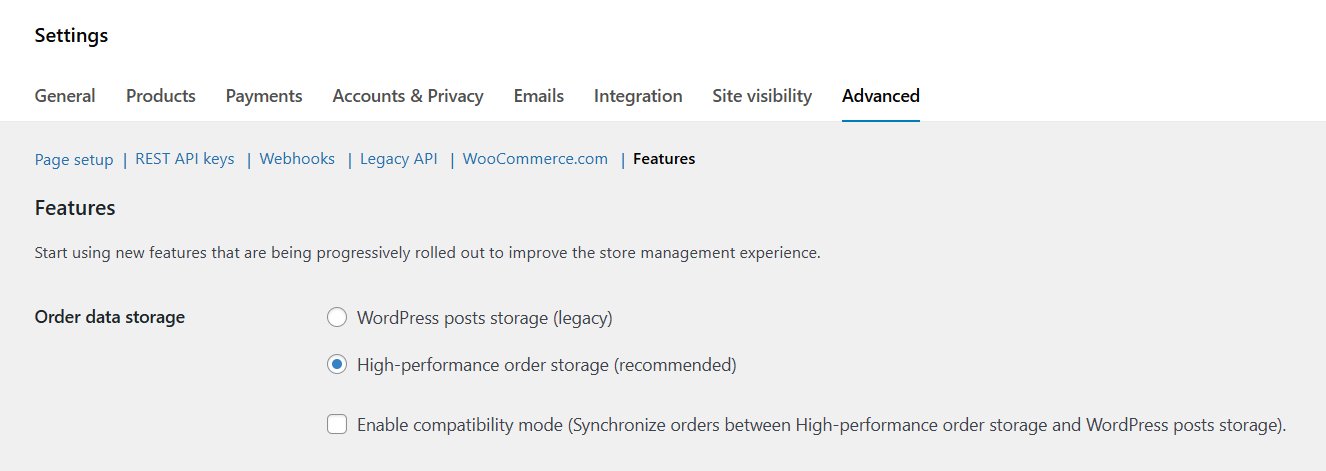
If you have the WordPress posts storage (legacy) system instead, there’s no need to enable the option.
Order notes
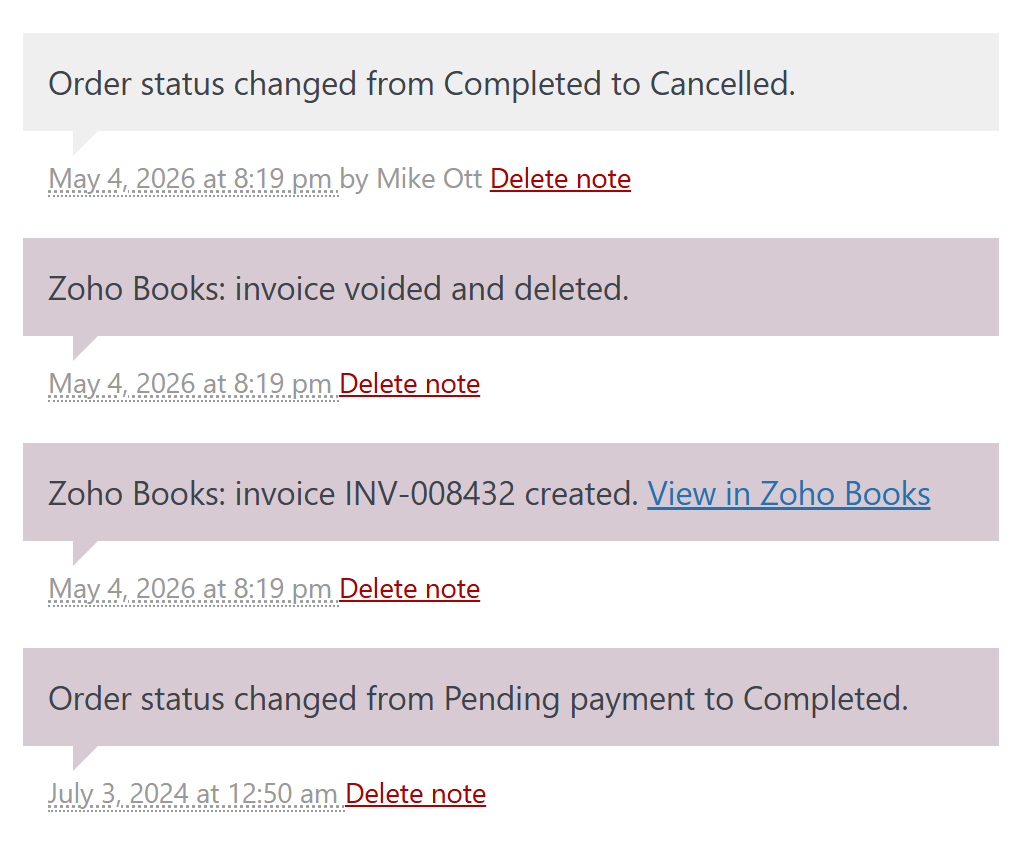
Whenever an order is pushed to Zoho Books, or the plugin has any updates to report, the order notes will be automatically updated.
Where do I enter my license key?
In your WordPress dashboard, navigate to Settings → Woo to Zoho Books and enter your license key where prompted.
What does the 'Deactivate License' button do?
To use the plugin on another domain, you’ll first need to deactivate the license on the site it’s currently activated on.
Clicking Deactivate License will prompt you to confirm before unlinking your license from this domain, allowing it to be activated on a different site.
Is the plugin price a one-time payment or an annual subscription?
The choice is yours.
Your purchase includes 12 months of updates and support, ensuring you always have access to the latest features, improvements, and support when you need it.
After this period you can optionally renew your license to continue receiving updates and support. Even with an expired license the plugin will always keep working without interruption, but an active license ensures your site stays secure, compatible, and running at its best.
Without renewal, you won’t receive future updates or have access to support until your license is reactivated.
For the best experience and peace of mind, it’s always recommend to renew your license. Renewal extends your updates and support for a further 12 months from the renewal date.
Changelog
v1.0.1 (30th July 2026)
- Fix: Rare issue where settings would not save while Open Graphite Pro plugin is activated.
1.0.0 (4th May 2026)
- Initial release

- Version: 1.0.1
- Updated: July 30, 2026
- Required: WordPress 6.0
- Made for:

Shop With Confidence Get a refund within 30 days, no questions asked.
Help Topics
- What does this plugin do?
- How to get an API key and your Organisation ID
- How to automatically push new orders to Zoho Books
- How to map custom fields
- Allow voiding and deleting invoices
- Automatically record payments
- Important things to consider before doing a bulk push
- What data gets pushed to Zoho Books?
- How to simulate a Push (Dry Run)
- How to bulk push all current orders to Zoho Books
- How to bulk push multiple specific orders to Zoho Books
- About the admin column
- Invoice numbers in Zoho Books
- What is the difference between the invoice numbering options?
- Prevent resending customer emails
- Order notes
- Where do I enter my license key?
- What does the 'Deactivate License' button do?
- Is the plugin price a one-time payment or an annual subscription?
- Changelog